Close any terminal or other program which can reserve the PC com port.
Start the ingenia dsPIC bootloader in your PC and follow the instructions.
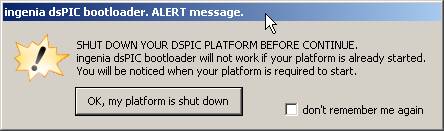
Switch OFF the JUMA TRX2
General
The boot loader
allows a user to update the JUMA-TRX2 firmware into the dsPIC30F6014A flash
memory without any special tools. The firmware is programmed through the
RS232 serial port. Only a PC with a serial com port, serial com cable and
the PC software is needed.
How it operates
The boot loader
is two part program.
1. The client
part
The client
part is a piece of software programmed into the JUMA-TRX2 control processor
(to the top part memory of the dsPIC30F6014A). The firmware coming with
the JUMA TRX2 kit includes this client part. Every time the JUMA-TRX2
is powered on the boot loader checks if the VFO button is held down during
the start up. This VFO button pressing is the signal for the boot loader
to start the procedure. The message is written into the TRX2 LCD display
and the boot loader starts to negotiate with the PC connection. If the
connection is not established within few seconds the boot loader starts
the normal control program. A start without pressing the VFO button transfers
the control immediately to the TRX2 normal control program.
2. The PC
side Graphics User Interface program
The user interface
program (GUI) is located in the PC and it transfers the firmware file from
the hard disk to TRX2 via the serial port. The PC side program (GUI) must
started before the JUMA-TRX2 boot loader. A successful communications between
the PC and the JUMA-TRX2 is indicated on the PC screen. The user can select
a firmware file (juma-trx2.hex) to load (flash programming) and start the
programming cycle.
The preparations
for programming a firmware
Get a PC with
the Windows XP operating system and with a RS232 serial com port.
Get a serial
com cable with a D9 female connector JUMA-TRX2 3.5mm jack plug. See
the picture
Get Ingenia
dsPICbootloader PC software by downloading it from here ingenia
dsPIC bootloader GUI V1.1
Install the
dsPICbootloader PC software.
IMPORTANT
!
After installing
the Ingenia bootloader into the PC, you must replace
the original file (ibl_dspiclist.xml) with
this file ibl_dspiclist.xml
Use mouse right button to "Save target as". The xml file is typically located
in the hard disk folder C:\Program Files\Ingenia\ingeniadsPICbootloader.
(Note! This xml file is compatible only with the Ingenia bootloader version
1.1.)
Get a JUMA-TRX2
firmware hex file (juma-trx2_Vxxx.hex) what you like to program into your
JUMA-TRX2. The latest firmware file can be downloaded from JUMA TRX2 site.
Connect the
serial com cable between the PC and the JUMA TRX2.
Note!
Before programming write down the Service Mode calibration parameters,
because they might be set to the factory deafaults depending on the extent
of the new firmware. Go to the Service mode to write down the parameters:
- Switch off
TRX2
- Push and
keep the PWR button down as long as the Service Mode is displayed in the
LCD
- Write down
each paratmeter in each service mode page by pushing the DISPLAY button
- Finally switch
off the TRX2
Firmware
programming instructions (for GUI Version1.1)
Close any terminal
or other program which can reserve the PC com port.
Start the ingenia
dsPIC bootloader in your PC and follow the instructions.
Switch OFF the
JUMA TRX2
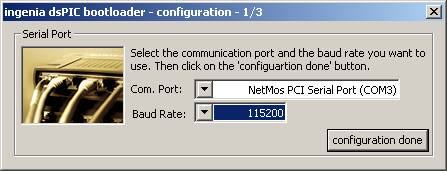
Configure the PC
com port if needed. Normally the default baud rate of 115200
works fine
but you can select a lower speed if needed. When
ready with the
com settings,
klick configuration done button.

Now the PC software
is waiting the JUMA-TRX2 Flash Writer to be started.
Start up (power
on) JUMA-TRX2 while keeping VFO button pressed.
You should
see the text below in the JUMA TRX2 LCD display.
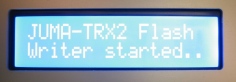
JUMA TRX2 Flash writer started

Successful communication
between the PC software and JUMA-TRX2 brings the above screen visible.
Click the open
HEX file button and select the hex file from your hard disk (for example
juma-trx2.hex).

After selection
of the hex file, the start write button appears. Click start write button
to start the flash programming.
The programming
should take about 5...15 seconds, depending on the baudrate.
Note! After
successful programming you have to disconnect power from the power supply
because the TRX2 green
PWR button
does not work in this state.
Finally switch on the JUMA TRX2 and test the new firmware. Check also the calibration parameters in the Service mode.
How to test
the serial communication
Start Hyperterminal
or any other terminal program in your PC. Configure the com port in use
to 9600-8-N. Connect RS232 cable to JUMA-TRX2. Power up JUMA-TRX2 (normal
power on start). You should see following text at terminal screen:
JUMA-TRX2 Firmware v1.02,
Test release / 230108
Copyright Juha Niinikoski,
OH2NLT
System Clock = 7500
kHz
EEPROM checksums, Cal
= 0, Def Cs = 0, Factory default resets = 1
TRX-2 voice memory option
found (ISD17240 chip)
Select RS232
= Test from juma TRX2 config pages. Now you can try few test commands
from terminal.
I (capital
I) should print the software version
E(capital e)
should dump JUMA-TRX2 configuration EEPROM content
Other commands.
See JUMA-TRX2 user manual and software source code listing.
JUMA-TRX2
boot loader software
Normally you
don't need to program the boot loader software, because it is included
in the TRX2 kit firmware. You need to program the boot loader only if you
have an "empty" dsPIC30F6014A chip. The boot loader can be programmed into
the dsPIC chip with Mplab ICD tool or equivalent programmer. Boot loader
code is based on Ingenia dsPIC bootloader firmware but modified for the
JUMA-TRX2. When programming an "empty" dsPIC30F6014A chip you should keep
the PWR button pressed all the time or install Jumper J4 in the DDS board
to keep power on during programming because the JUMA-TRX2 power switch
is software controlled.
Some tips
for your own firmware
If you are
compiling your own firmware for JUMA-TRX2 special linking loader script
for Microchip C30 compiler should be used. There must always be a jump
to the user code start at absolute program memory address 0x100.
.text __CODE_BASE :
{
/*
** Generate extra goto __reset
for boot loader. OH2NLT 050106
** Boot loader allways jump
to start address 0x100
*/
SHORT(ABSOLUTE(__reset));
SHORT(0x04);
SHORT((ABSOLUTE(__reset) >>
16) & 0x7F);
SHORT(0);
*(.handle);
*(.libc) *(.libm) *(.libdsp);
/* keep together in this order */
*(.lib*);
*(.text);
} >program
For more details see the provided JUMA-TRX2 source code and Mplab project files.
Alternative programming
method
You can also program the
JUMA-TRX2 firmware with Microchip ICD 2 tool or other programmer without
the boot loader. However if you do this, the boot loader is erased from
dsPIC30F6014A flash memory and it must be reprogrammed if needed later.
For the initial loads a special hex file is available including both the
boot loader and the firmware. See TRX2 technical page.